|
Well, this semester flew by. My learning project is coming to an end this week. For my learning project I chose to explore my new Kitchen Aid Stand mixer that I got for Christmas. I decided to focus on making different types of dough using my new gadget. Let's do a little recap of my progress throughout the past few months of EDTC 300 and my #learningproject. WEEK 1: "Let's Dough This" This was my very first post for EDTC 300, in this post I talked about my ideas, thoughts and intentions for the #learningproject. I wrote out a broad outline of what I would like to accomplish and how I may do so. I said in my first blog that I wanted to make a loaf of Sourdough which I did! But I also said that I wanted to recreate the Orange Boot Birdseed Sourdough loaf, which I wasn't quite able to accomplish successfully. WEEK 2: "I Loaf It" & "What's Haley Doin' This Week?" Resources used: Canva & Pinterest This week was my first time using my Kitchen Aid and learning how it worked. It was also my first time working with any type of dough. This was a learning curve week with a lot of firsts. Looking back now I am proud of myself with how my doughs have turned out in comparison to week 2's loaf. WEEK 3: "Bun-derful!" Resources used: Instagram/Blog & Youtube This week was a bit of a nightmare. I remember thinking how I would be able to even shape the bun dough. It was SO sticky. I was worried they would not turn out and I would have to write about my first FAILED attempt. But some how they turned out fabulous. WEEK 4: "Valentine's Day Special <3" Resources used: Animoto & Youtube This was a cute #learningproject experience. I made a heart shape pizza for this week's post. I used Animoto to document my progress for the first time. WEEK 5: "Everyday Kitchen Cinnamon Buns" Resources used: Animoto, Youtube, Instagram/Blog This week I tested my skills with a multiple step recipe. I was challenged in new ways. I tried Animoto another time to iron out some kinks from my previous attempt and documented my progress using Animoto again. WEEK 6: "Focaccia <3" Resources used: Smore, Tik-Tok & Youtube This week was hands down my most successful (and tastiest). The Tik-Tok recipe was amazing, the new creation tool, Smore, was an awesome tool and of course, the final outcome was so yummy. WEEK 7: "Salty Goodness" Resources used: Canva, Tik-Tok, Youtube This week was probably the trickiest of them all. This was the first time I had to shape dough and boil it. I managed to make it through successfully and they were delicious. WEEK 8: "Bagels are Everything" Resources used: Pinterest & Fotobabble This week I made bagels for the first time. I was able to use the knowledge I learned from last week. Which made the process of shaping and boiling the dough go smoother. I used another new creation tool, Fotobabble which I enjoyed using and exploring. WEEK 9: "Let's Go, Sourdough!" Resources used: Instagram/Blog, Website/Google, Tik-Tok & Youtube My second last week of my #learningproject. I kept the sourdough starter alive for all ten weeks and this week I finally got to use it! This was another recipe I have never attempted at making and I was pleasantly surprised when it worked out so well. WEEK 10: "Sourdough...Take Two" Resources used: Google & Anchor My final week! I used my sourdough starter again to try out another sourdough loaf with a twist. It turned out very well but I wasn't fond of the taste of the cheddar, chive and sourdough together. If there was a week 11, I would attempt a "seedy" type sourdough to go out with a bang!  Overall, the #learningproject was an awesome way to use and learn about creation tools, online resources and how my Kitchen Aid worked while making dough. I was able to use explore new creation tools each week to help me document my progress during the past ten weeks. I was also able to find new recipes through online resources that I could use for this project. I would be lying if I said I wasn't worried about how this project would go. Using new to me creation tools, online resources, and learning how to work with different types of dough is a lot to learn all at once. But I am proud of my progress. I have learned so much about new ways to find resources and new ways to document my work. I am also thrilled that I have mastered new recipes that I can share with family and friends (once it is safe to do so)! Picture Retrieved from: https://images.app.goo.gl/XeNwgayJ4nJ7kfcr8 Main Takeaways:
Haley :)
0 Comments
4/12/2021 0 Comments Sourdough...Take Two
I know I keep saying this, but HOW? How is it already the last week of classes for the semester? This semester flew by, and I have to say, I "loaf-ed" being in EDTC 300. This course taught and provided me with practical information, resources and material that I am going to take with me as a future teacher. With it being my last and final #learningproject post this week, I wanted to use another new creation tool. I remember Katia and Amanda talking about Anchor the first couple weeks of the semester and it always caught my attention. I am not sure why I left it until the end to use, because boy-oh-boy is Anchor an amazing creation tool.
Anchor is known to be, "the easiest way to make a podcast". And they're not wrong. I downloaded the app onto my iPhone months ago because like I said, I was intrigued by Anchor and using a podcast format to document my work. It took me some time to actually open the app and use it. But when I did for this week's post, I was pleasantly surprised by how EASY it was to use. The layout is very user-friendly and everything you need it right where you would look for it. I didn't have to search around for what I needed (like the record button, music, etc). The photos below are what you will see when you first open the app and begin to use the app: 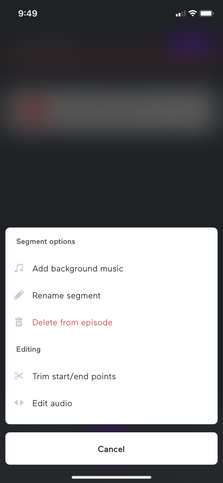
Once I started recording, I liked the option of placing "flags" on areas I would want to go back and edit. I thought that was a nice touch to add instead of going through the whole podcast and finding that exact time stamp yourself (especially if you were making longer podcasts, that would be a pain in the butt). I also liked the feature to add music. They had many options and "genres" to chose from that were free. This app had everything you would need and want when making a podcast to your personal liking. I would HIGHLY suggest using it.
Below is my first attempt at using the podcast creation tool, Anchor:
If you would rather read what I said in the podcast see the script below:
"Hi and welcome to my very first podcast episode. This creation tool has me excited but I also feel like I am just talking to myself… anyone else feel that way when they start a podcast? No? just me? Ok, great! Anyway. This semester just FLEW by and I can hardly believe that the semester is coming to an end this week. This week is my final #learningproject post for EDTC 300 and I decided to continue mastering the art of making sourdough. Last week I made my first loaf of sourdough using my own sourdough starter. I was really happy with last week’s progress and how the sourdough turned out so I figured this week I would experiment with the dough some more. I figured I could attempt making a “flavoured” sourdough loaf this week. Originally, my goal was to re-create an Orange Boot Bakery “birdseed” loaf. Now, if you’re not familiar with the local bakery that was open in Regina in 2010-2017, it was a local, organic bakery that made artisan bread, buns and other treats. I used to work there for a couple years and the birdseed bread would sell out most days. It was one of the most famous items you could purchase. The birdseed was a mix of sourdough, white and whole wheat flour. Along with that, it had multiple different seed inside the dough (hence the name, birdseed). Some of the seeds includes: flax seeds, sunflower seed and chia seeds. Although this was my goal, I wouldn’t say I am there quite yet. I have only made sourdough once before this attempt so I wanted to keep it pretty simple. So, this week I decided to make a cheddar chive sourdough loaf. I did the exact same steps as last week when making the dough and letting it rise multiple times, but this time I grated cheddar chive and finely cut up some chives to add into the dough. This loaf of bread somehow turned out almost twice the size of my fist one? Which I am still a little confused about. I did everything exactly the same as last week yet this time the loaf turned out HUGE. I am thinking it has to do with my sourdough starter since I fed it a few hours before I used it this time. The sourdough starter is quite finicky and you almost have to have the perfect timing to use it. In all my research it says to use the starter when the bubbles have begun to form in the starter, so that’s what I did this time… maybe my bubbles were a bit older last time… hmm, I guess I need to keep playing and experimenting with the dough until I have mastered the perfect sourdough loaf. Anyway, the loaf still turned out, and tasted just fine, I just had more this time. Since I had such a huge loaf this week and my partner was working out of town, I decided to split it in half and send my parents some to try. They enjoyed the bread too! BUT… If I was being honest, I don’t think I would do this flavour again, I think I preferred just the plain sourdough. Saying this though, I am still wanting to try and attempt to re-create a loaf of Birdseed bread. Now that bread is DELICIOUS! Maybe since the semester and final assignments are coming to an end within the next week, I will make one soon! Thank you so much for following along with my #learningproject, I can’t believe this is my last post but I know I will continue to experiment and play with different types of dough using my new Kitchen Aid stand mixer." Haley 4/4/2021 0 Comments Let's go, Sourdough!"Sourdough bread is made by the fermentation of dough using naturally occurring lactobacilli and yeast. The lactic acid produced by the lactobacilli gives it a more sour taste and improved keeping qualities" Retrieved from: https://g.co/kgs/Zn82B If you go ALL the way back to week one, my first ever #learningproject post, I talk about how my goal was to make sourdough bread. And well, this week, I made sourdough bread! Let's rewind to January. When I found out about our EDTC 300 course and the learning project, I created a plan and knew I would need a sourdough starter if I wanted to achieve my goal. If you are new to the sourdough world, sourdough doesn't use yeast (like you would add in for any other bread making recipe), instead to make sourdough, you need a sourdough starter. A sourdough starter is, "to cultivate the wild yeast in a form that can be used for baking. To keep the starter happy, you have to feed the starter with fresh flour and water over several days, until the starter is bubbly and billowy. Once it reaches that frothy, billowy stage, the starter is ready to use" (Christensen, 2020). The whole "feeding" process was a little weird to me at first. Since I have had my starter for months now, I felt like all I was doing was feeding the starter fresh flour and water to keep it alive for this weeks post. But now that I have made my first loaf, I am a proud sourdough starter Mom who can safely say they kept their starter alive and well this whole time. I was actually influenced by a local gal on Instagram who often posts about her baking adventures. One day she posted a sourdough loaf on her story (it looked PERFECT), so I decided to DM (direct message) her and see if she would share her recipe. And she did, AND on top of that she offered to give me some of her starter, which was so, so, so kind of her. So, now I had a sourdough starter sitting in my fridge that I have to "feed" weekly up until this week... This is my starter (see picture below) 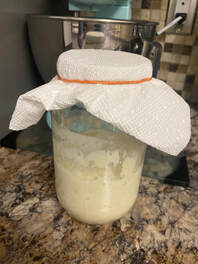 During this time, my job is was to take good care of my sourdough starter. I have heard from many other people that the starter is the most crucial part when making sourdough bread. So, I did some of my own research. First, I went to Instagram and watched Jillian Harris' highlight reel, "Sourdough". I also turned to "Bake with Jack" on Youtube to watch some videos before I attempted making my first loaf this week. Both of these accounts shared valuable information to guide me through my first attempt at making Sourdough Bread. 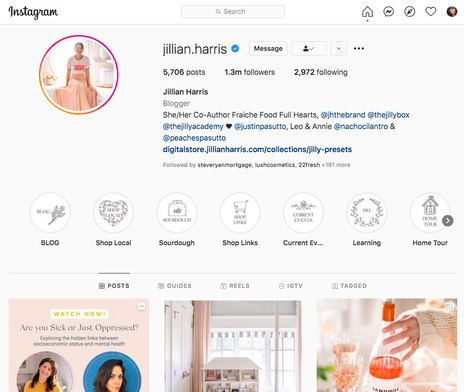 Although those two resources were helpful, I found this one to be the most helpful. Clever Carrot, A Beginners Guide to: Sourdough walks you through the steps, techniques and terminology of making sourdough so clearly. I would highly suggest giving this web site a read if you're ever wanting to make sourdough or if you just want to learn more! Sourdough is not an easy recipe to make. It takes a healthy starter, several rises, and TIME to make. But, if you have the time and a healthy starter, I would highly suggest making it. It is so worth it. This week to display my learning I *attempted* to use Tik-Tok as my creation tool. To be completely honest, I found it hard to use the app. This was my first time using Tik-Tok to create my own video, I use the app to scroll through other videos and accounts. I went into making this video with the idea that I wanted to create the "finger snapping transition" between the video clips of dough and bread. I have watched MANY Tik-Toks that use this transition before. Each Tik-Toker makes it look so easy and smooth, so I thought I would be able to do it. Nope. It was a lot harder than it looks. I give huge props to Tik-Tokers who create visually appealing footage. Above is my attempt at making my first Tik-Tok using the "finger snapping transition". It is safe to say I need to do spend some more time learning how to create and edit videos on Tik-Tok. I think I will stick to watching others :)
Haley 3/30/2021 0 Comments Bagels are everything Last week I posted some inspiration from Tik-Tok by Mariam. This Tik-Tok user is unreal at what they do. I could scroll through their feed all day and find so much inspiration. This week I decided to branch away from Tik-Tok and Instagram and check out Pinterest instead for a recipe. I am a HUGE Pinterest lover. If you were to look me up on Pinterest, you'd find my many boards which cover all my interests. Some boards may include: teaching, classroom hacks, interior design, cooking, fashion, gardening and lifestyle trends. Pinterest is usually my go-to for inspiration so I am surprised I haven't turned to this app yet during my #learningproject. I ran to Pinterest and typed in "best bagel recipe". And this is the first one I saw and it had over 2500 5-star reviews. I would say that's a pretty good sign for a keeper recipe. So I didn't think I needed to keep browsing. I stuck with this one. "New York-Style Bagel's" is the name of this recipe and it appealed to me. If I can't travel due to Covid-19 restrictions, then maybe I can bring New York to my own kitchen ;). In the write up before the author shares the recipe, they state that the recipe is "simple", "delicious" and "perfection", I mean, how could I not be appealed? This recipe walked me through how to make bagels as a first timer in great detail and didn't skip any steps. I have to say I was a tad nervous about shaping the bagels because last week when I made pretzels the shape was tricky to make, but this donut shape was pretty simple. The only down side was when they were boiling they got a bit "smushed" and the middle hole got bit squished. Overall, this is a minor fail and they turned out great. My boyfriend and I taste tested them afterwards with some cream cheese and we gave them a 8.5/10. We rated them that because we wished they rose more. They were a tad "flat", which made it tricky to cut and put into the toaster. The shape may have been off but the taste was still delicious!  Photo Retrevied from: https://images.app.goo.gl/3igwaALmLk9G7CHx8 Side note: I saw another EDTC 300 classmate, Shanna B., who also made bagels, you can check out her #learningproject here. They look delicious too! This week I used a NEW creation tool. I tried Fotobabble. Fotobabble allows you to add voice recording to your images which then creates a little video. I created a Fotobabble which can be found at the end of this post. I found this creation tool to be quite straight forward. You could upload the select images you wanted and then place them in the correct order for your final "video" clip. As you can see below, I uploaded my images on the left and then which ever image I wanted a voice recording, I would click on the image and then there would be the choice to add a voice recoding (microphone image), text (T image), edit (paint brush image) or delete (trash can image). I tried to play around with the Text and Edit option, but there wasn't a whole lot you could do other than filter, crop, or add a text below the image selected. So, I stuck to using the voice recording option (microphone button). 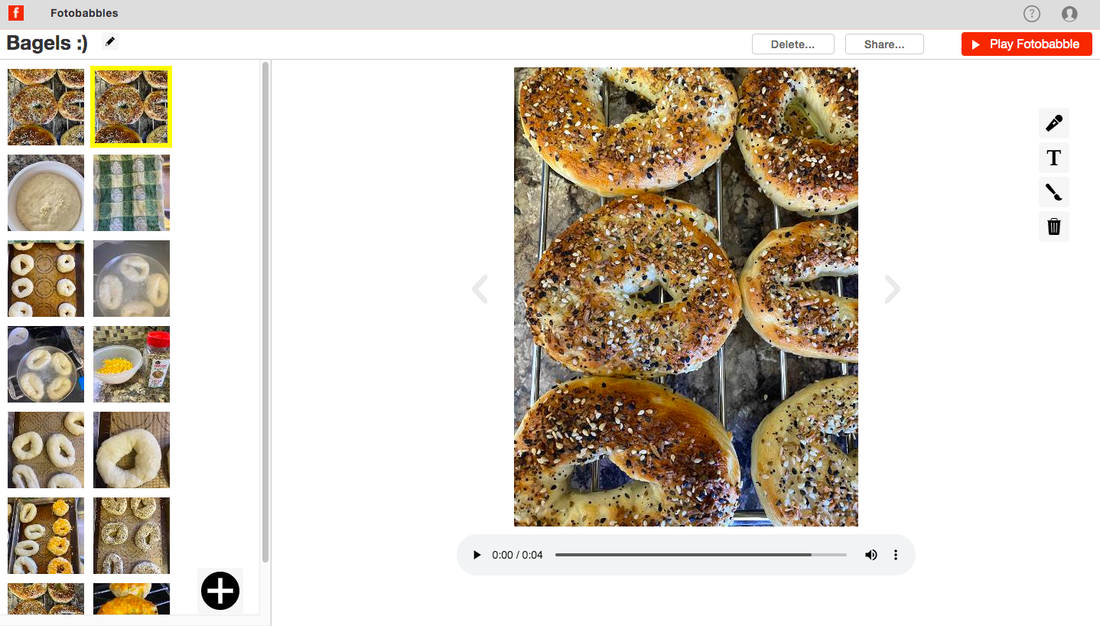 For the voice recording option, it was honestly quite simple. You would press the "start recording" and then would verbally say what you wanted and then you could press "stop recording", it then would load, and then you had the chance to "listen" to the recording, "re-record" or "save" the voice recording. From there, you would do a voice recording for each image you wanted a voice over for.  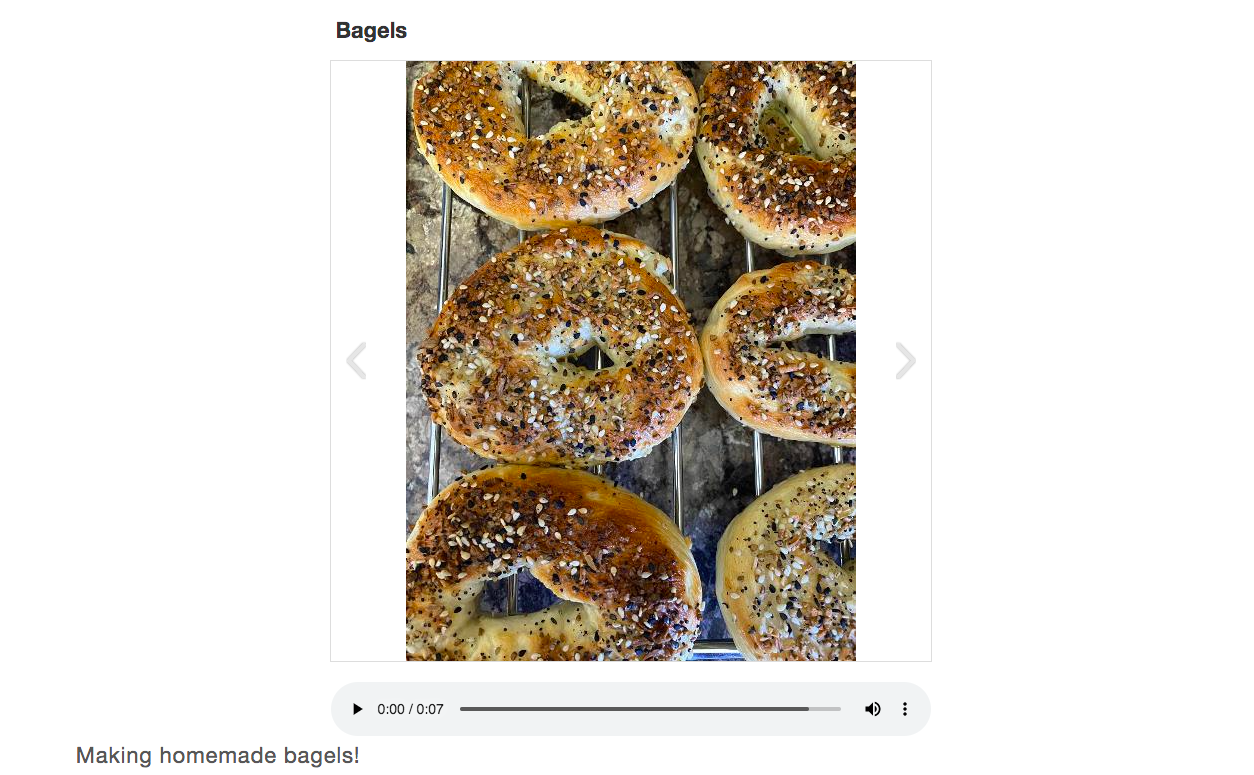 In the image above, you can see I used the text option and voice recording option. Check out my first Fotobabble creation here. Overall, I would give an 8/10 rating for Fotobabble. It is VERY user-friendly but I wish it had more options for details and making the clips look more appealing. I would use Fotobabble again but I think I would combine last week's creation tool: Canva AND Fotobabble for a more appealing experience. If you are interested in knowing more about Fotobabble, check out this creation tool review.
Stay tuned for next week #learningproject, Haley 3/24/2021 8 Comments Salty Goodness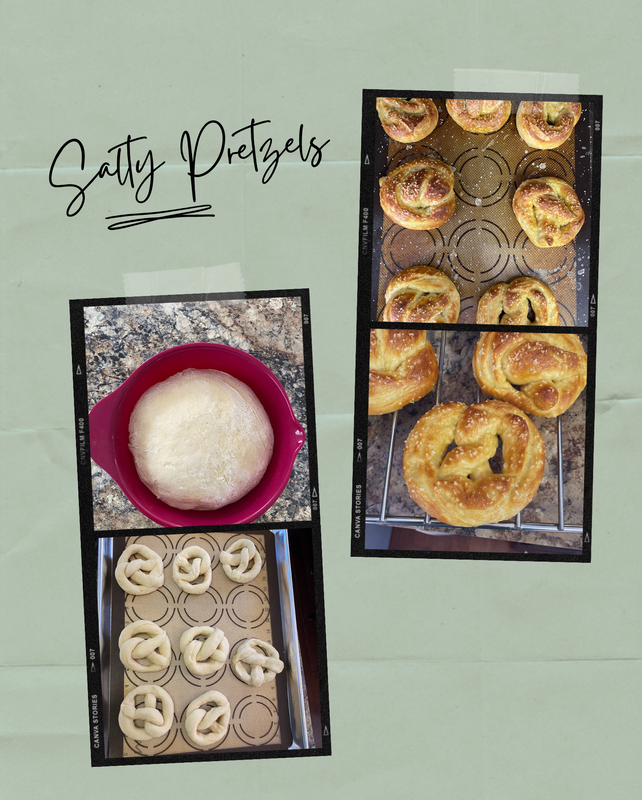
Photo Retrieved from Canva.com
Tik-Tok yet again influenced me this week for my #learningproject for EDTC 300.
An account I follow on Tik-Tok is @mxriyum. Mariam is one outstanding baker. On this account they bake everything from cheese rolls, homemade bread, and everything in between. Mariam is extremely talented and everything they make looks like it is out of a magazine. I saw Mariam post a video of "Boujie Pretzels" AKA Thyme Pretzels, which influenced me to make pretzels this week. I saved the video for inspiration (see below)
While I was creating these pretzels, I came to a stop when I had to shape them. Honestly the beautiful little knot is a little intimidating. I was just getting used to working with dough, and now I had to figure out how to make this unique shape. I turned to YouTube to guide me. I found this video to be pretty helpful during the shaping process:
I know I said last week that the Focaccia was my favourite thing I have baked thus far, but I may have a tie... these salty and soft pretzels were pretty darn good. I would highly suggest making them. I would not say they were nearly as easy as last weeks focaccia, but they were worth the shaping, boiling, egg wash and salt sprinkling. If you're thinking of making the pretzels, I want to share the recipe I used. I follow Amy's Recipe Book on Instagram, which is where I found the recipe I used to make these pretzels. Amy's Recipe Books is local to Regina and creates family friendly recipes. I used this recipe to make the pretzels.
Let me know in the comments below if you follow Amy or if you try this delicious recipe!
I've been using Canva for about one year now. As of late, it has come extra handy during my pre-internship. But this week, I was influenced by Haley Begrand's "Canva For Teachers: Series", to try my #learningproject using Canva. This was my first time using Canva and my own images. Previously when I used Canva, I just used Canva's stock pictures or added "spice" through other aspects that Canva provides. I honestly LOVE Canva, and suggest you check out Haley's blog and Youtube videos if you're interested in learning more about the creation tool (especially if you're a teacher or soon-to-be teacher!) I find this creation tool to be very user-friendly and provides so many FREE options to create appealing visuals for just about anything.
Sidenote: I just noticed that Canva has Instagram Story templates... I always wondered how people I follow always have such beautiful stories... I am SO going to try that out next time I make an Instagram story!
Stay tuned for next weeks #learningproject creation. For now, here is my inspiration:
Categories3/10/2021 4 Comments Focaccia <3
Let's Talk about Smore:
Smore is a website that allows you to electronically create appealing and professional looking flyers and newsletters.
And that it did. The flyer I created using Smore is posted above. When creating a "flyer" for my experience making Focaccia bread, Smore made it super simple. The layout is extremely user friendly and straight-forward. You start by picking out the theme, where they have free stock themes, or if you have Pro, you could upload your own theme. Then you choose a color scheme and font. From there, you can play around with the template. You can add a title and subtitle. You can add or delete titles and texts anywhere in the the flyer, as well as adding in pictures. What I liked about Smore is how easy it was to embed other links. I added the Tik Tok I used, along with the recipe used. Lastly, I loved the option of uploading a video within a flyer or newsletter. This is such a neat feature. Often when I think of a flyer or newsletter I think of something dull and boring. But with Smore, it is completely different. Smore allows you to create engaging content that is interactive and appealing to the eye. As a future teacher this is something I would totally use. I have already thought about the ways I could use Smore in the classroom (monthly updates, classroom spirit days, etc). If you want to learn more about Smore or read a review I would suggest this one. Overall I give Smore 9/10, I would definitely use Smore again! Haley Categories3/3/2021 4 Comments Everyday Kitchen Cinnamon Buns
Before I start my blog post, I HAVE to know, have you tried Everyday Kitchen's cinnamon buns?
If you haven't gone yet, I HIGHLY recommend going and grabbing a cinnamon bun and iced coffee (this weather calls for iced drinks, IMO). I have also tried a few of their sourdough donuts. My all time favourite is the cinnamon sugar donut but I know their brown butter donuts sell out almost everyday.
OK, you get the point, Everyday Kitchen is a local bakery and coffee shop that is worth supporting. My brother's partner actually introduced me to this recipe. She brought them over for dessert one Sunday night for family dinner (pre-Covid times :(). When she brought them, my entire family fell in love with them and since then, I have been meaning to try the recipe myself. And since my #learningproject is focused on making different types of dough, I figured this was the perfect time to do so. This week I wanted to explore Animoto some more so I created yet another video using the app. The video I made this week shares the recipe and a step-by-step process of how I made them. But I wanted to share another blog account that made the same cinnamon bun recipe, Shana posts her experience in written format and it is definitely worth a read (plus the images she uploads with the post are drool-worthy)! As for next week, I am thinking I am going to explore the world of Focaccia. This tik tok is my inspiration for next weeks #learningproject post:
Be sure to check in next week and see how my focaccia turns out.
Haley :) Categories2/2/2021 0 Comments "BUn"Derful!My first attempt at making buns went "bun"derfully! Well... kind of... Let's start from the beginning. Ok. So, back in March 2020, when the whole world was in lockdown due to Covid-19, I saw an influencer I follow on Instagram post her homemade bun recipe. Kiteen told her followers that they were a family favourite and wanted to share the recipe with her followers. Let me refresh your memory, the recipe was shared when everyone was stuck inside and turned to baking as an outlet. People were making banana bread and whipped coffee like there was no tomorrow. In our city, there was actually a shortage of baking ingredients (check out this article if you some how forgot ;)) Anyway, when Kiteen released this recipe, I quickly saved it and was planning on getting the yeast and flour I needed for it on our next outing (we were only able to leave once a week for groceries). Except, due to the baking shortage, I was unable to get my hands on some yeast, flour, and toilet paper (that's a story for another time hehe). But, once the first wave of Covid-19 slowed down, I was more worried about spending my time outside and appreciate not being stuck in the house so the recipe was put on the back burner. It is safe to say, I have had this bun recipe saved on my phone for quite some time now. When EDTC 300 #learningproject began, I knew I needed to add homemade buns to my list (I NEEDED to try this loved recipe). So, thats exactly what I did. This is the recipe I used and all the credit goes to Kiteen: 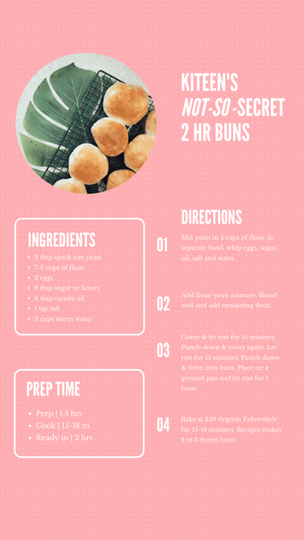 Fast forward to this week when I attempted to make these buns. I figured since I made homemade loaves of bread last week, I could make some homemade buns this week - seems like a good progression to me. This recipe was very clear and easy to follow. Everything went smoothly until it was time to shape the buns. I didn't take pictures of my process because my hands were COVERED in dough. The dough was SO SO SO SO sticky. I knew something was up when I couldn't even shape a bun. I had to clean off my hands and search what to do next. I found this video helpful: I eventually was able to form my buns into bun-looking shapes. I sprinkled them with some "everything but the bagel" seasoning and plopped them into the oven. And they came out BUN-derful (Check out those pics below)!!!! I am still not exactly sure where I went wrong with the sticky dough. But other than that stickiness, I would highly suggest everyone trying this recipe. They are delicious and the recipe makes a few dozen (my freezer is filled with buns now- not mad about it). I would give this recipe 10/10. See you next week for something sweet, -H. 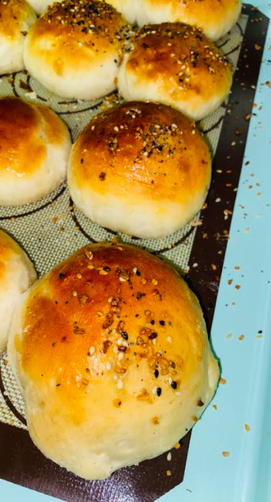 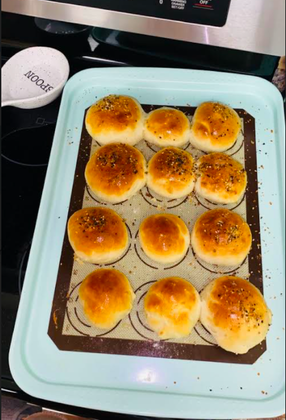 Categories1/29/2021 0 Comments What's Haley doin' this week?
This week I watched:
This week I listened to:
My inspiration for next week:
Categories |
AuthorHaley Miller |
 RSS Feed
